Saturday, December 3, 2016

Making Pumpkins

Carved Pumpkins
Updates don't happen often here, work is taking up all my time basically. But I found some inspiration and a drive to make these pumpkins even though Halloween had just passed. But better late than never.

I don't have many in progress picture for this project, as it felt so easy to do and I kind of forgot. I hope my explanations won't be too confusing without the aid of pictures.

The rather messy mesh before smoothing the surface
For the modelling I started out with a normal sphere that I extruded every second panel to get the shape of a basic pumpkins. To further get the shape I used a FFD-modifier.

Once satisfied with the shape I used the cut tool to carve the faces, also using I reference picture and working in a 2d-view. It was a lot of work cleaning up afterwards and getting a nice topology that wouldn't look weird with smooth on top.

I made the stem the same way as the base shape was made on the pumpkins. Using a cylinder, extruding every second row and using and FFD-modifier to make the shape more uneven.
This was just a very short and easy project, made mostly because it was fun and to update my website with. I do have tons of half finished projects, so it was nice to actually just complete something for once.


In postproduction I spent lots of times refining the masks from VRay-Material-ID. I never find them to make perfect masks and should probably do some research out on the Internet to see how to get good masks to work with, since the postproductionen for this picture shouldn't have taken me more than an hour or two. 

Monday, February 1, 2016

Making Something Soft

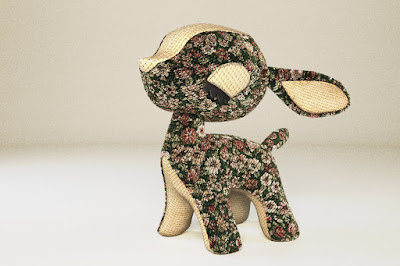
Stuffed Bambi

On one of those seemingly endless times of scrolling on the Internet I came across this cute picture of a stuffed Bambi and with it I found inspiration. With this work I wanted to focus on creating a fabric-like material. I have always struggled with getting materials to look realistic, so this picture has been a challenge.
Inspiration

Trying to find a pattern for this 3D Bambi wasn't easy, what looked good on a picture didn't look good on the model. But after a lot of samples and experimenting I settled for a darker pattern. This pattern made me think of those thicker fabrics that are often used on armchairs. So that's how my Bambi ended up a lot more different in texture compared to the inspiration picture. For the details I wanted to contrast with a brighter colour, to preventing the cute Bambi getting too dark.

Testing of different patterns

When it comes to rendering passes I tend to always use three, besides the obvious RBG-pass. Alpha, crucial when you want to add a background in post production. VRay ExtraTex with a VRay Dirt map, which gives definition/texture for shadows, difficult to explain but I always use it since it gives more depth to the final picture. MultiMatteElement is the last pass, sometimes multiply depending on how many materials I have. This pass renders your material in solid red, green and blue, which makes it so much easier to select them and do adjustments to just one selection of the pictures. Hope that made sense.


Left: Vray Extra Tex, Right: Multi Matte Element


Tuesday, October 13, 2015

The Making of Spooky Church


In the spirit of the the Halloween that soon will be upon us, I recently made and updated my website with this spooky church. This post will describe the process of how this picture was created.


INSPIRATION
Bye Bye Mr. Moon part 7 - by - Thomas Nielsen/TinyPilot
The idea and inspiration to make this piece came to me when I found this illustration. I liked the mixture between cartoon and spooky and thought it would be fun to try and do something similar in 3D. It would be a great opportunity to make an environment, since I very rarely make those. Mostly when I create something, both 3D and drawings, it ends up just being an object without a scenery.

THE 3D SCENE
The scene in 3ds Max from a different angle
I started the scene with building its main feature, the church, which design I based on the illustration. After getting the model done, I skewed it by using a FFD-modifier, to give it a more cartoon look,

For the tiles on the roof and the panels on the wall, there were two ways of making them. They could either be modeled, and duplicated with the Array Tool. Or they could be created by using Displacement Maps. Since I could lay a good time on rendering the scene, I ended up choosing to use Displacement Maps to gain the details.

The environment surrounding the church was created with paint on brush and particle system to quickly and easily distribute the grass and gravestones. I experimented with adding dead trees in the scene, to cast shadows, but didn't end up with any satisfying results. Once the final camera angle was set, I cleaned up the details in the environment that wouldn't be seen. If it's not visible, there's no reason to keep it in the scene since it would only make the rendering time longer. It is because of this clean up that the scene looks rather broken when looked from another angle.

Final camera angle and light
It took a lot of time and a fair bit of help, to end up with the final light. I found it a bit difficult to light this dark scene without getting it grainy and losing the details. My first try was with a Daylight system, trying to get the redness in a sunset, but did't end up looking as I had wished. In the end I ended up using normal VRay Lights to lit the scene.


POST-PRODUCTION
Original Render
As you can see from the picture straight from the render, there has been a lot of Photoshop used to make the end results. I experimented in 3ds Max with fog and lights, but did not get satisfied with the results, so I decided to create the atmosphere to the whole scene with Photoshop and tons of layers.

Color Correction, Contrast and Sky added
I started the editing process by adding a sky and tweaking the colors and contrast of the different objects in the picture. Combining Adjustment Layers with Layer Mask, extracted from the MultiMatte Rendering Pass, I settled a foundation. Since there would be light effects added upon this foundation, I kept it dark so that the added effects would not make the picture too bright.

Left: Lights from windows | Right: Atmosphere
The next step was to at the lights, shining from the church, which required many layers to end up with a satisfying result. Lastly added to the picture was the atmosphere, which contains of a fog and vignette.

END RESULTS

Visit website for bigger resolution
I hope this has been a somewhat interesting read. If you have any question about the process, feel free to leave it in a comment below and I will do my best to come with a good answer.

//Maria

Wednesday, September 30, 2015

Welcome Blog

First post on the blog, so lets start with and introduction.

The author, me, is Maria and I am a 3D Artist at a game studio called Zoink, located in Gothenburg. At work I do all kind of 3D related things, I model, rig, animate, build environments and more. And guess what I do when I get home; all kind of 3D related things.
Yeah, I'm addicted.

This blog will work side by side with my online portfolio and it will be filled up with progress descriptions on the pictures that you can find there. Shortly you will see a description on how I made the spooky church that now can be seen on the website.

Once again, welcome. I hope you'll enjoy your stay.

//Maria